Introduction
Many companies these days want to avail their corporate data to clients enmass. HTTP servers connected to the Internet, for example, is one common technique through which this is accomplished. The ubiquity of web browsers can account for this, as they require no deployment or configuration at the client side. Applications which execute across two or more machines are commonly termed 'Multi-tier' and DCOM and CORBA are two predominant, rapidly evolving technologies which facilitate development of such. This paper is about software development using these two technologies in Borland C++Builder 3.Distributed Computing Fundamentals
Distributed computing in general describes the coordination of processing amongst physically distinct and geographically isolated computational units. It forms the basis of several disciplines including distributed databases, operating system clusters, transaction processing, simple networked file systems. This section discusses a few fundamentals of distributed computing pertinent to multi-tier applications in particular.Multi-tier Scenarios
First let's look at a few common scenarios for multi-tier applications. The simplest and perhaps most common scenario is client/server:
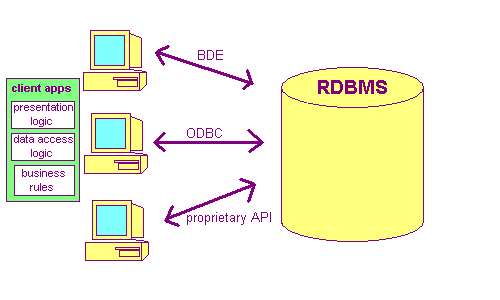
This arrangement has been used for some time in the practise of computing where data is stored on machines running a database management system (DBMS), typically an SQL DBMS, such as Interbase, Oracle, Sybase, MSSQL, Informix. Access and manipulation of the data is performed by applications running on client workstations. Both display logic and business logic are contained within the client application.
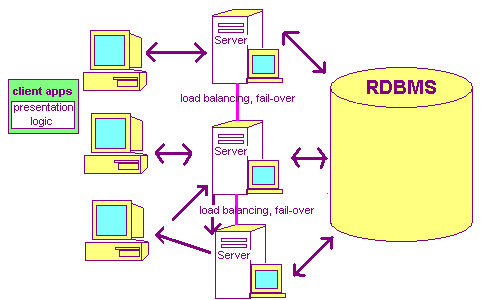
In order to maximize reusability of the same business logic in other client applications and to make client applications smaller, the concept of an application middle-tier evolved:
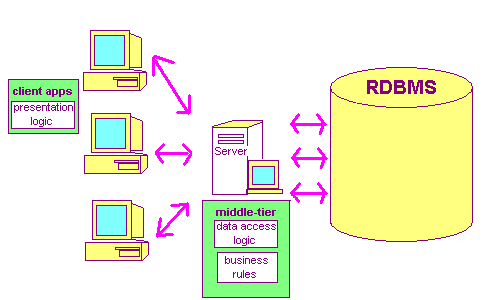
In this 3-tier model, the business logic is contained in a separate application, often running on a separate machine, accessible by multiple clients. Client applications now only contain the display logic and call to methods on the middle-tier for retrieval and manipulation of the data. The middle-tier is responsible for executing client requests and fetching data from and resolving data to the DBMS. The middle-tier should, like the DBMS, be able to service multiple clients simultaneously while maintaining synchronization and integrity of the data in coordination with the DBMS.
The 3-tier model leads naturally into a multi-tier model by realising that the middle tier can easily be chained into multiple applications providing business logic executing across multiple machines.
Note:
- In between the progression from client/server to 3-tier application models, DBMS vendors developed, stored procedures and triggers. These allow for business logic to be stored on the SQL server instead of the in the client application. This is quite useful as the DBMS already has the ability to manage simultaneous requests by a large number of clients and maintain data synchronization and integrity. But stored procedures and triggers, only play a supporting role in the grander scheme of large scale object-oriented architectures so well subscribed by the multi-tier model.
HTML-Embedded Clients
With the advent of the web, client applications can now be simplified to be downloaded on demand and run within an HTML browser. The advantages are clear:
The first advantage, no client-side configuration, is also often gained by using a stand-alone client application deployed on a standard fileserver. Clients on the network connect to the fileserver and run the client executable directly from a shared volume. Such a solution however is not cross-platform. A different version of the application would have to be available for every different OS clients might be using. (Well, alright, DCOM isn't cross platform either, but we will return to that later). This is also not a suitable solution for WANs with a large number of public users. The time it takes to download and execute an application embedded within a browser is fractional compared to the time it would take to download and execute a Windows application with comparable features, user interface, etc. Clients simply wouldn't want to wait each time they run your client application.
- No client-side configuration
- The client application is embedded in an HTML page. Both application and page are stored on the web server and downloaded each time the HTML page is accessed from the web server. Version updates are deployed once only to the web server.
- Reduction in size of executable to be deployed
- The developer can rely on the browser and HTML for much of the user interface.
- Ease of accessibility
- For most people, their HTML browser is their gateway to the Internet. Having an application embedded in an HTML page will provide easiest access for users.
Easier access == More Users == More Hits == More $$$, or at least more Advertisers calling for you to display their banner on your website.
- Ease of usability
- Users are already familiar the user interface of an HTML browser and require little or no training on interacting with an HTML-embedded client application.
Applications can be embedded in HTML a number of ways:
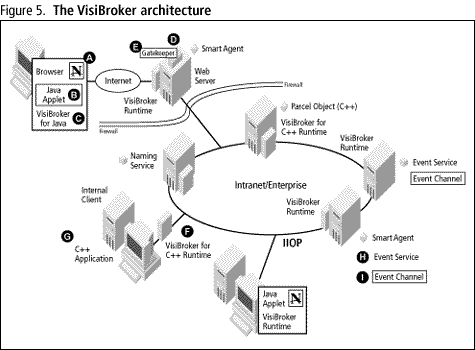
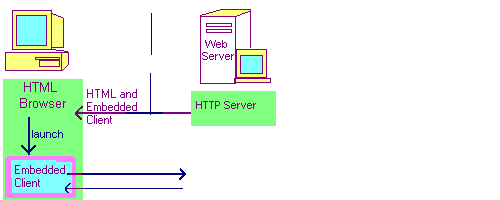
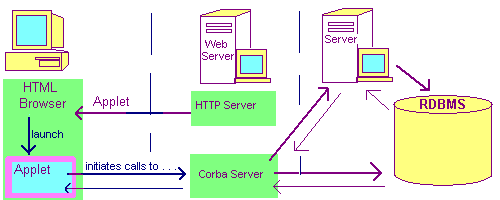
Applets can't initiate conversations with anything but the HTTP server. Middleware like DataGateway®, GateKeeper®, or a CORBA server, can run on the HTTP server and access other server machines. If your applet is to connect directly to a machine other than the one from which it is downloaded, you have to make it trusted (which means working with signed applets and the Netscape or Microsoft security API). As depicted in the figure below, the HTML browser downloads an applet from the HTTP server. The applet is launched within the JVM of of the browser and can communicate only with the same machine running the HTTP server. A Corba server, for example, could be made available on this machine however, and it can make calls to any machine and return results to the applet.
- CGI - Common Gateway Interface
- HTTP 'GET' or 'POST' calls are embedded in the HTML source referencing an executable stored on the server (.exe, perl script, ISAPI/NSAPI dll)
- JavaScript/DHTML
- Extentions to HTML syntax. Commands co-exist with HTML source.
- ActiveX controls
- Microsoft's technology available only in Internet Explorer and the Windows operating system. Commands are embedded in the HTML source to download an ActiveX control, which is simply an .OCX file, which is a DLL, and have it's code loaded in to the address space of Internet Explorer and executed within Internet Explorer's process. There is one third-party plugin for Netscape's browser which supports ActiveX of which I am cogniscent. Rumour is that it is perhaps not so robust.
- Java Applets
- Browsers such as Netscape Navigator, Internet Explorer, Sun's Hot Java, have a Java Virtual Machine (JVM) embedded in the browser (Sun also has a JDK Plug-in for the first two browsers to synchronize JVM support - this is what we at Borland recommend). Commands are embedded in the HTML source to download the java class files comprising the applet from the HTTP server and execute the applet within the browser's JVM.
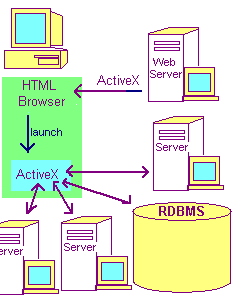
Unlike Java applets, ActiveX controls have no such restriction. They are simply DLLs which Internet Explorer loads and executes at runtime. They have full access to the client's system and any network to which it is connected. For this reason, when you load an HTML page with an embedded ActiveX control in Internet Explorer, you are alerted as to whether you trust this control and whether you wish to continue.
Firewall Scenarios
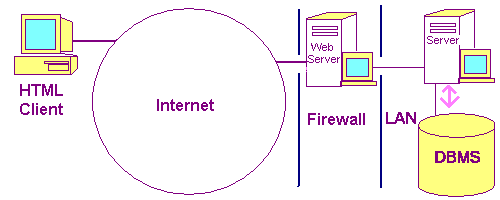
A firewall is conceptual term used to describe a configuration of one or more computers and routers which act as a security mechanism for data communications between a LAN and WAN, such as the Internet.Multi-tier applications are frequently deployed across the Internet. Consequently at least one firewall normally needs to be transgressed in communication between one of the tiers. Often an enterprise makes part of their corporate database and perhaps a middle-tier application available to the public over the Internet. So a corporate firewall would normally separate the client application from middle-tier and DBMS. Furthermore, if a particular user happens to be running the client application from within another corporate LAN, there would then normally be two firewalls separating the client application from the middle-tier and DBMS.
There are five common firewall configurations:
Please see the Visibroker Training for a good discussion of these configurations. Below are some diagrams of common scenarios with firewalls and HTML embedded clients.
- One dual-ported machine
- One packet-filtering router
- One router and one gateway machine
- Two routers and one gateway machine
- Two routers and multiple gateway machines
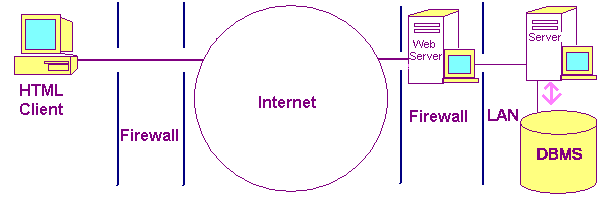
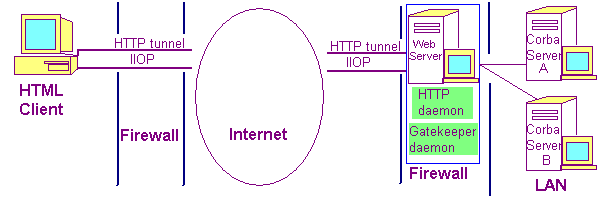
Transport Protocols and Session Protocols
There is often confusion between network transport protocols and session protocols. A review of the ISO's OSI model will aid in illustrating the differences.
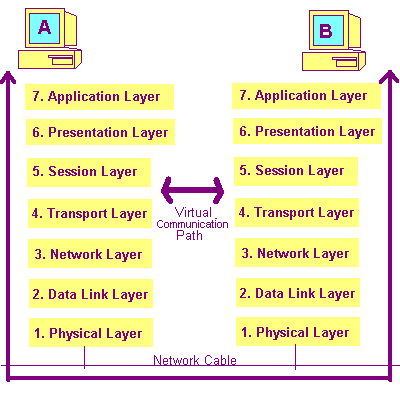
The International Standards Organization established the Open Systems Interconnection model to overcome incompatabilities between the networking schemes of different computer vendors. This standard describes the flow of data from an end-user application down to the network cable, when communicating across a network. Each layer defines specific services it provides in progressing data along to the next layer. It is intended that implementations of a particular layer be independent from implementations of its adjacent layers. This is so that in communication between two computers, the data that a layer works with is exactly the same data with which the same layer on the other computer worked.
I will discuss the Network, Transport and Session layers. The remainder can be reviewed in the Windows NT Networking Guide, from the Windows NT Resource Kit, MS Press.
In general, transport protocols in Windows provide the services of both the Network and the Transport layers. The transport protocols provide the following services.
Common transport protocols are as follows:
- translation of logical addresses into physical addresses
- addressing of messages
- grouping of data frames into packets for transmission
- route determination
- error detection and recovery during transmission
Other protocols which we commonly hear in multi-tier application development such as HTTP, IIOP, RPC and Sockets provide the services of the Session layer. Session protocols provide the following services.
- TCP/IP
- This is the transport protocol of the Internet.
- IPX/SPX
- This is the transport protocol Novell made popular with its Netware product for LANs. It is used most commonly to connect to Netware servers.
- NetBEUI
- This is the transport protocol usually used for peer communications between Windows machines on a LAN.
Common session layer protocols used in multi-tier application development are:
- Establishment of a session between two applications on different computers
- Name lookup so that an application can be connected to its complement application across the network
- Determination of which side transmits, when and for how long
- Synchronization between the two applications when sending data so that if transmission is faulted, both applications can agree on an arbitrary point at which to resume transmission
- HTTP - Hyper Text Transfer Protocol
- This is the protocol used by web browsers to download HTML pages from web servers.
- IIOP - Internet Inter-Orb Protocol
- This is the protocol developed by the Object Management Group. It is part of the Common Object Request Broker Architecture (CORBA) specification for development of distributed applications.
- Sockets
- UC Berkely developed the Sockets API for applications to communicate over the network. It is quite popular due to its relative ease of use and availability, especially on Unix systems. It is not uncommon for other session protocols to be implemented using Sockets.
- RPC - Remote Procedure Call
- This was developed by the Open Software Foundation as part of its Distributed Computing Environment specification. This is the foundation for DCOM. RPC extends into the Presentation Layer of the OSI model as it provides marshalling of programming language data types via mappings into IDL (Independent Definition Language).
- RMI - Remote Method Invocation
- This is a Java specific protocol which can be used for simple distributed applications in Java. Usually developers will opt for IIOP as RMI only supports Java applications and also does not scale as well. IIOP implements thread pooling which enables scalability.
Naming Services
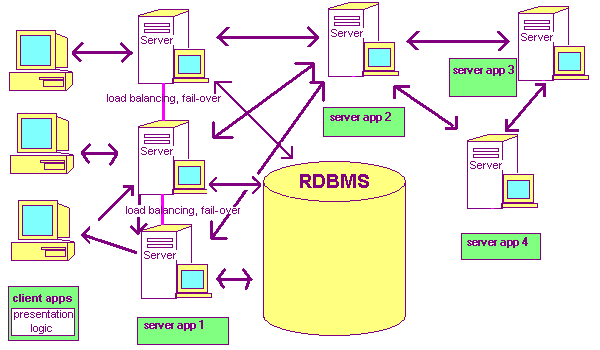
At some point, a client application will leave its local machine and venture out on the network in search of a server application. Depending on the session protocol, one of several different naming and lookup methods will be used. Each constitutes the same underlying task: lookup in a simple database which maps the name of a server application to an actual file and/or process on a physical machine somewhere on the network. Some methods can resolve a name to any one of several possible machines offering redundancy or even load balancing for multiple requests of the same server application. In the figure below, the four requests for server application 'Foo' are satisfied by three different server machines which have 'Foo' available as registered in the naming service.
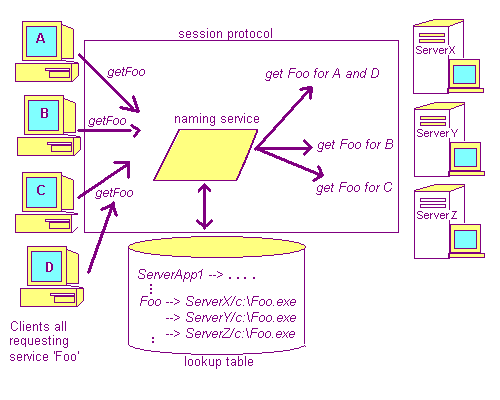
Alternatively, since it is common that server applications can serve multiple clients simultaneously, some lookup methods provide mapping not only to a particular file on a machine, but to the process if that file has already been executed and is present in memory on the server machine.
The following is a decription of the common naming service methods.
- DNS and URL - Domain Name Services and Universal Resource Locators
- This is the method used with HTTP and other Internet protocols such as FTP, Gopher, SMTP. Every TCP/IP client is configured with the IP address of a machine which will be its domain name server. A domain name has the form, for example, inprise.com. A machine in a particular domain is specified with the form, for example, www.inprise.com, or ftp.inprise.com. Anytime one of the above protocols requests a machine in a particular domain, the domain name server will search in its lookup table for the actual IP address associated with that machine. If it is not found, the domain name server will forward the request to the domain name server for which it is configured. The chaining will continue in this hierarchical fashion until a match is made.
A URL contains a protocol, machine name, domain name and file name. It has the form, for example, http://www.inprise.com/techpubs/index.html, where the request is for the file techpubs/index.html at the domain inprise.com on the machine www using HTTP protocol.
- ORB - Object Request Broker
- Part of the ORB in Inprise's Visibroker, the part called Smart Agent, is, a basic, proprietary naming service. Lending to Object Oriented design, the ORB maintains a lookup table of objects and the machine and on which they reside. By itself, the ORB only knows of actively executing objects - that is, it keeps track of processes, not files. In conjunction with the Object Activation Daemon however, executable files which contain objects can be loaded on the server and a reference to the now active object returned to the client. See COS Naming for more information about CORBA naming services.
- COS Naming Service - Common Object Services Naming Service
- As mentioned above, the Visibroker ORB's Smart Agent is a proprietary naming service which provides the bare essentials for locating Visibroker CORBA objects. The CORBA specification does however, define a comprehensive standard naming service called COS Naming Service. Unlike the Smart Agent, a COS Naming Service allows arbitrarily complex names for objects, possibly represented in a graph depicting an enterprise object structure. It also enables interoperability of objects between different orbs.
- GUID - Globally Unique IDs
- GUIDs are 16-byte hexadecimal identifiers guaranteed to be unique throughout the universe as know to mankind. The lookup scheme for DCOM uses GUIDs listed in the Windows registry to determine the UNC name (UNC names have the form \\ccalvert_NT4\sharedVolume\DCOMServers\MyDatabase.exe) for a particular server application. It is not as comprehensive a scheme as ORBs since it only allows for a GUID to be associated with one and only one UNC name. Redundancy of the server application over several machines is not possible.
- OLE Enterprise
- This is a product which comes with C++Builder Client/Server. It was developed by Open Environment Corp. who were bought by Borland in 1996. OLE Enterprise is a naming service for COM. It was developed before and substitutes DCOM. It actually improves upon DCOM because it provides load balancing, fail-over saftey and interoperability with RPC servers other than Microsoft's.
- JNDI - Java Naming Directory Interface
- This is used in conjunction with RMI to locate Enterprise Java Beans on the network. It is implemented partly by JavaSoft and partly by other naming services which would normally be already present on the network. Eg. DNS, LDAP, NDS... (We do not cover the latter two in this paper.)
Load Balancing and Fail-Over Safety
Two major benefits of applications which execute across multiple machines are the opportunity to implement Load Balancing and Fail-Over Safety.These features don't always come free for the programmer. Although the development technology which you are using might make it easier often there is some programming work to be done, contingent upon the task being implemented. This is especially true for fail-over safety.
- Load Balancing
- As we saw in the section on DNS servers, through redundancy of a server application across several machines, multiple simultaneous requests for that server application can be dispersed evenly across those machines.
- Fail-Over Safety
- In addition to load balancing, the redundancy of a server application across serveral machines can permit recovery if a server goes offline during communication with a client. The session protocol can intervene in such case, initiate communication with an alternate server and possibly even continue communication at some arbitrarily agreed upon interval within the previous communication.
IDL
Multi-tiered architecture is part of the movement in software engineering toward object oriented design. It is very convenient for software engineers to compliment an object oriented model with multi-tier architecture - units of functional service or requirement can be formulated into groups of objects, and those objects can be allocated to separate physical computational devices. There are many programming languages which support ojbect oriented design: C++, Java, Borland Pascal, Smalltalk, Visual Basic and of course TASM's Object Assembly.
What is object oriented design? Put all programming languages aside for a moment. Picture two connected computers, A and B. Imagine A wants to ask B to do some processing. You could imagine A calling a function on B, passing data in arguments. Now, collect several related functions and data items on B and create an object. Call the functions methods, and the data items properties. Now picture A grabbing a handle on that object, filling the object's properties with values and calling it's methods. Now express your application architecture as collections and hierarchies of objects in this fashion. This is the essence of object-oriented design. (There are three primary concepts in OOD: encapsulation, inheritance and polymorphism. An excellent source for these can be found in Calvert [1998] or Thorpe [1997])The Open Software Foundation developed as part of their Distributed Computing Environment specification, the Interface Description Language(IDL). It is a language for describing object models independently from a programming language. Both DCOM and CORBA have adopted IDL to acheive language independence. Normally when developing an application which will use DCOM or CORBA, you will first design using objects, defining them in IDL. You will then use your esteemed development tool of choice to process your IDL script and generate declarations for your objects in the programming language you will be using. You will then proceed to implement the methods of those objects in that programming language.
To give you an idea, here is the IDL script for the Smart Stub example which comes with the Visibroker for C++, in Borland C++Builder 3 Enterprise.
// Smart Stub example

interface Dictionary {

  typedef string KeyType;
  typedef string DefinitionType;
  typedef sequence KeyListType;

  struct EntryType {
    KeyType key;
    DefinitionType defn;
  };
  typedef sequence EntryListType;

  // List all keys in the dictionary
  KeyListType allKeys();

  // Lookup a definition in the dictionary based on a key
  boolean lookup(in KeyType key, out DefinitionType defn);
};
The actual syntax for IDL can varies between that for DCOM and that for CORBA. The former is called MS IDL, the latter CORBA IDL. The difference is due to the differences DCOM and CORBA technologies. Borland Delphi 4 is one tool which bridges these differences somewhat in its ability to expose CORBA objects as DCOM objects.Surely there is much documentation on IDL, but I would like to mention there is a good short tutorial on CORBA IDL in the Visibroker Training material.
What is DCOM?
DCOM stands for Distributed Common Object Model. It defines an architecture for distributed applications and offers services about the presentation level of the OSI model described above. It is Microsoft's proprietary technology and is part of the Windows OS. There are third parties which have ported DCOM to the Unix platform, but for the most part, DCOM is used for developing Windows-only applications.
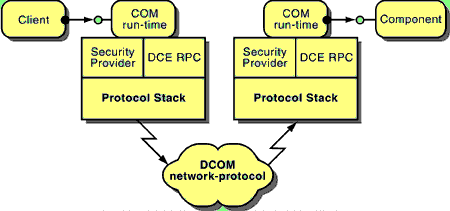
As shown the diagram above, DCOM is implemented on RPC. This is Microsoft's implementation based on the OSF DCE standard. The RPC in Windows is completely interoperable with RPC on HP's Unix, IBM's AIX® and any other DCE RPC facilities . The RPC in Windows can conveniently operate over several transport protocols: NetBIOS, Sockets, or named pipes. You can see that DCOM extends COM - an architecture and facility for objects communicating on the same machine. This aspect of DCOM facilitates simple conversion of a COM application to an application distributed across the network.
DCOM communication operates roughly as follows:
- On a particular network, there is an application either on disk, or already loaded in memory, on a particular machine. This application is a server application, or an automation server. It contains automation objects which are available for other client applications, automation controllers, to request to perform some functions.
- Controllers reside on other machines on the network. They identify the automation objects using a Globally Unique Identifier (GUID) which each object has.
- On the machines on which the controllers are running, the GUIDs for each object are registered in the Windows registry, as being available on a particular machine, housed in a particular executable file (the file of the automation server).
- When a controller proceeds to invoke an object - that is, it requests to connect to the object and manipulate it for a while - DCOM on the controller's machine reads the registry, looks up the machine and filename, and sends a blast over to that machine across the network.
- DCOM on the server's machine receives the blast, kicks into gear and launches the server if it is not already running.
- The automation server then instantiates the requested object, identified by it's GUID, and passes an interface pointer on the object back to DCOM.
- DCOM on the server machine passes the interface pointer back to DCOM on the client machine.
- DCOM passes this to the controller which can now manipulate the object as it sees fit.
Similarily automation server applications can provide single or multiple use objects. An automation server can instantiate a new instance of an automation object for each controller, or it can create one instance of an object and instruct DCOM to supply that instance to all controllers which invoke the object.
What is CORBA?
CORBA stands for Common Object Request Broker Architecture. Like DCOM, CORBA also defines an architecture for distributed applications. Presentation level CORBA services, called the Object Request Broker (ORB), are part of the Visibroker products. There are other vendors besides Inprise, who provide an ORB as part of their CORBA solutions.CORBA is a standard developed by the the Object Management Group, a standards consortium comprised of representatives from a host of industry participants. For ORBs like Visibroker's, which are fully CORBA 2.0 compiliant, registered CORBA 2.0 compiliant objects are fully accessible regardless of the tool with which they were built. CORBA is consequently platform independent as well.
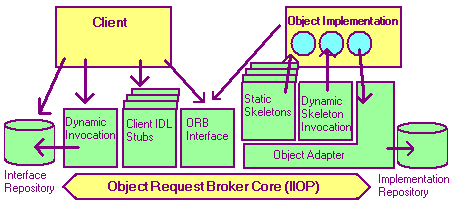
As shown in the diagram above, CORBA uses IIOP as the session protocol, as per OMG specification. IIOP itself was also developed by the OMG as part of the CORBA specification. (The Visibroker ORB uses TCP/IP as the transport protocol for IIOP.)
CORBA communication operates roughly as follows:
- On a particular network, there is a running application, already loaded in memory on a particular machine. This is the CORBA server application. It hosts any number of CORBA objects.
- Anywhere on the network, there is another application which is a daemon, (also termed service or resident application), which keeps track of what objects are available, what machines they are on and what and process IDs they are in. This daemon is the naming service. It is up to CORBA objects to register themselves with the naming service if they wish to be available to serve clients.
- The naming service comprises part of the ORB. The ORB is logical network which connects CORBA objects and is comprised of the naming service and a library of routines linked to a CORBA application. In the Visibroker for C++, this library is ORB.DLL (and variations on that name.) In the Visibroker for Java, it is VBJORB.JAR
- Elsewhere on the network, CORBA client applications broadcast a request to bind to the object. When using the most basic method, the object is identified by the name of the class of the object as it appears in the source code.
- The naming service locates the first available machine and process which on the ORB which has the object requested. There may be multiple processes across multiple machines which have registered with naming services on the ORB. The ORB in this way provides load balancing and fail-over safety.
- The ORB returns an object reference to the client.
- The client uses the object reference to communicate directly to the object. At this point, the naming service is completely out of the communication.
Comparison of DCOM and CORBA
Here is a little chart exhibiting the favor of CORBA.
| Cross-Platform? | Cross-Language? | |
| DCOM | No | Yes |
| Corba | Yes | Yes |
| Java/RMI | Yes | No |
- Language independence with both
- Platform independence only with CORBA
- DCOM's lack of fail-over safety and load balancing
Inprise Products for Multi-tier Application Development
The array of products offered by Inprise for multi-tier application development is complex such that most Inprise employees themselves are confused.- Visibroker
The Visibroker product line is the most recent addition to Inprise offerings for multi-tiered development. The Visibroker was acquired through the merger of Borland and Visigenics, early 1998. Specifically it is the industry leading solution for CORBA development. It includes the following products,- Visibroker for C++
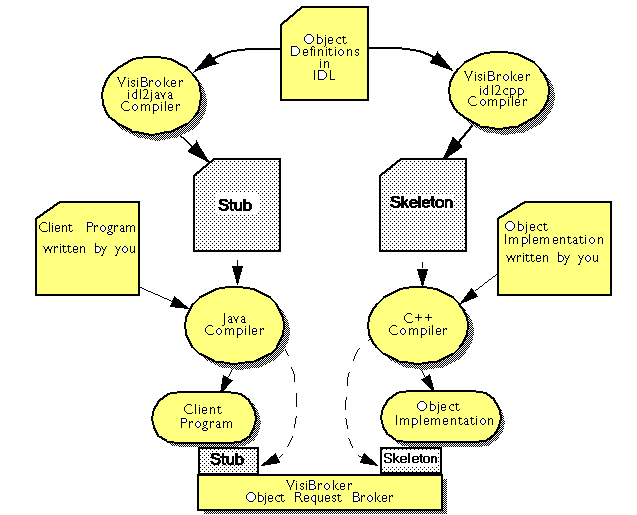
This is available separately and with C++Builder 3 Enterprise. It provides the basic CORBA 2.0 compliant ORB, an IDL to C++ compiler and a series of other runtime and diagnostic utilities. The ORB is constituted by a series of libraries to be linked to your application and a daemon called Smart Agent® which provides basic, proprietary naming service for objects. Smart Agent also provides fail-over safety and load balancing. - Visibroker for Java
This is the Java complement of the C++ version. This comes with the Client/Server edition of JBuilder. - Visibroker Naming Service, Visibroker Event Service
These are fully CORBA 2.0 compliant services. They come with C++Builder 3 Enterprise. They are not included with JBuilder Client/Server.
- Visibroker for C++
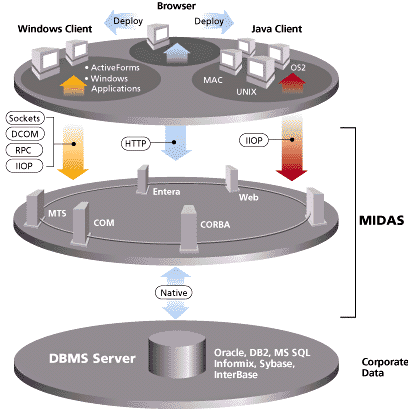
- Midas
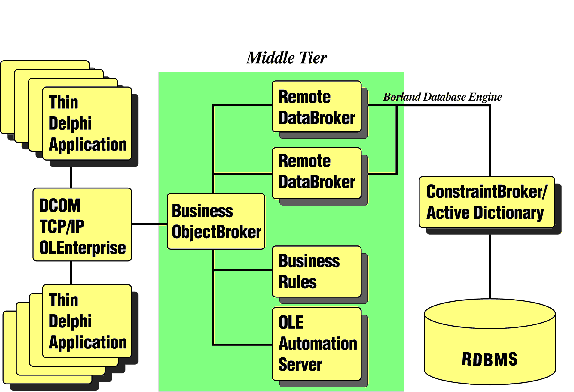
Mostly all the Midas components and utilites come with the Client/Server editions of C++Builder and Delphi: Remote DataBroker, Business ObjectBroker, ConstraintBroker.These are all a one needs to develop a multi-tier application using Midas. The Midas product by itself is what you would need when you actually proceed to deploy your application. Aside from the same components and utilities which come with C++Builder C/S and Delphi C/S, Midas includes a runtime install program and runtime licences needed for applications which use the Midas components. If you only want to develop and test an application built with Midas, C++Builder C/S or Delphi C/S is all you would need. C++Builder 3 Enterprise included the runtime install and licences for Midas.
- Entera
This is a product acquired when Borland merged with Open Environment Corp. in 1996. Entera is a full featured, robust middleware product which enables you to develop fully DCE RPC compliant servers and clients. You will definitely want to consider Entera if you are doing serious RPC development and require scalable, multi-platform application servers and DBMS access. I was quite impressed by Entera when researching it for this whitepaper. - OLEnterprise
This product also came from Open Environment Corp. It is an alternative to DCOM. If you have OLEnterprise, you don't need DCOM on your system. You can take regular COM applications and distribute them easily across Win95 and WinNT machines. OLEnterprise also provides fault-tolerance and load balancing. Of course, being from Open Environment Corp, COM applications can talk to RPC servers built with Entera. OLEnterprise comes with C++Builder 3 Client/Server and has no additional fees for distribution. It is a great solution for small to mid sized distributed applcations which can benefit from the ease of deployment and additional features that DCOM fails to offer. Calvert [1998] chapter 27 has a good section, complete with code sample, on the topic of OLEnterprise.
C++Builder 3 ships with the full Microsoft Active Template Library. You will find the classes for this library collected entirely in the directory include\atl. They are predominantly header files as the classes are predominantly C++ template classes. If templates are new to you, you might want to review them in Stroustroupe [1997].
The ATL has been designed for compactness and efficiency of execution. Being written using C++ templates, code is generated at compile time based only upon the interfaces you request. This eliminates the predicament prevalent with other class libraries where your COM server ends up carrying about superfluous code. This is precipitated by the class library having been written with aspirations of being all things for all projects. By using the ATL you can be assured that standard implementations you might be using have been well designed by OLE experts, offering you the assurance your OLE code will be procedurally optimized.
The Automation Object requires you have a project open already. The idea is that you can start with any application you have already developed and expose its functionality to other applications using COM. Once you have done that, providing access to other applications across the network is simply a matter of configuring DCOM using the Windows administration tools.
The Type Library Editor provides a graphical user interface as an alternative to typing IDL statements in a text file. Using the Type Library Editor, you describe the automation object you wish to expose. The terminology for this is, defining the interface. You describe methods and properties that your object will offer. Instead of generating a text file containing IDL statements which you would then have to compile yourself in order to generate the C++ declarations, the Type Library Editor performs this step for you. It also generates a .tlb file which is a binary representation of your automation interface that is used by controllers at runtime to inspect your automation server. Both the C++ declarations and the .tlb file are generated when you click the Refresh button. The Register button will actually attempt to compile your application so that the Type Library Editor can run it with the parameter /RegServer. This will induce execution of the code which will add the type library to the Windows registry and associate it with your server application. This registration code was generated when you added an Automation Object to your application.
Upon clicking the Refresh button, the following files will be added to your projct. These are the default names.
Now we need to add the class which will act as a proxy for our automation object running in the automation server. The class is called ISampleObjectDisp and is declared and implemented in files SimpleServer_TLB.h/.cpp. To add this class to our controller project, select Project|Import Type Library and double click on SimpleServer Library.
We are by no means obligated to call BindDefault when our controller application initializes. We can call it any time.
DCOM Application Development
In this section we will first give a brief overview of developing a DCOM applicaion. Next we will do a quick step through developing and deploying a trivial DCOM application. Finally we will discuss Borland's Midas technology and how it uses DCOM to provide real-world solutions for Inprise customers.DCOM Application Framework in C++Builder 3
With C++Builder 3, developers have more choices than ever before. OCF and MFC are both included with the product. In addition, the C++Builder 3 Object Repository has sevaral wizards, ActiveX Control, ActiveForm, Automation Object and several other templates for COM and ActiveX development. These items make use of both the Visual Component Library (VCL) for windowing support and the Microsoft Active Template Library (ATL) for OLE support. The two libraries are connected by a couple of classes known as ATLVCL. The ATLVCL classes are packaged in the following files.
The advantages of this powerful combination are lightweight, web-enabled OLE support coupled with the RAD functionality of the VCL. It also allows us to leverage our existing VCL code base and with but a few clicks of the wizard, expose it as an ActiveX control or Automation Object.
Overview of Developing a DCOM Application in C++Builder 3
When developing a DCOM application in C++Builder, you will use the Automation Object from the Object Repository. You open the Object Repository using File|New and selecting the ActiveX property page.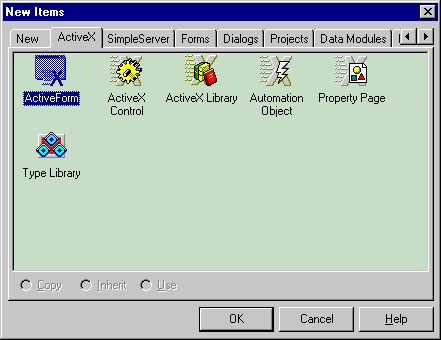
Automation Object in the Object Repository is not the only alternative for developing COM servers in C++Builder 3. It is the fastest. You are perfectly at liberty to use any of ATL, MFC, OCF or the OLE API, all of which come with BCB3. For a more complete discussion of these frameworks and their history in the Borland C++ product line, please refer to chapter 28 in Calvert [1998].
When you create a new Automation Object, you are first prompted for the name you would like to give to the object, and then the Type Library Editor appears.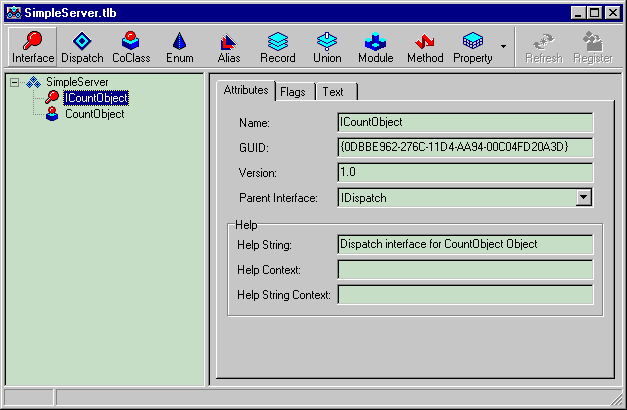
A Simple DCOM Server in C++Builder 3
		private:
		    long intdata;
		    WideString strdata;
Do so by right clicking in the .cpp file and selecting Open Source/Hdr. Add the declarations to the class TSampleObjectImpl.
WideString is inherited from Delphi's WideString, and is simply a wrapper for BSTRs, which are used often in COM for passing strings. BSTRs are simply wchar_t pointers (wchar_t*) which have the length of the string stored two bytes before the address pointed to by the wchar_t*. In order to take a regular character string pointed to by a char*, simply call MultiByteToWideChar, followed by SysAllocString. Voila, you will have your original string in a BSTR. When you want to free up the memory pointed to by the BSTR, simply call SysFreeString. In our TSampleObjectImpl class, we could easily use a straight BSTR and call the OLE API functions just mentioned to initialize it ourselves. But the WideString class saves us code statements by doing it for us. We could also use the CComBSTR class, which is part of the ATL. With C++Builder 3, you have many options!
*Value = intdata;
if ((static_cast
Notice we use WideString's overloaded BSTR cast operator to check if strdata is null. If it is not, we copy the pointer value contained in the WideString, strdata, to the memory location pointed to by Value. If it is null, we throw a C++ exception.
intdata = Value;
strdata = Value;
                char buf[128];
                wsprintf(buf,
                        "The values are: \n\t intdata=%ld \n\t strdata=%ls",
                        intdata,
                        strdata.c_bstr());
                MessageBox(NULL, buf, "SimpleServer::ShowProperties", MB_OK);
Here we simply stream the values of intdata and strdata into a message string which we display in a Windows message box. We have to pass the wchar_t* returned by c_bstr() since the variable parameter list of wsprintf will not invoke the BSTR conversion operator of our WideString, strdata.
A Simple DCOM Client in C++Builder 3
Now we can build the trivial DCOM controller application which will invoke our trivial automation server. The controller will set and get both properties NumericValue and StringValue, and invoke the ShowProperties method. We will create the controller application as project within our SimpleDCOM project group.
#include "SimpleServer_Project_TLB.h"
                private:        // User declarations
                    ISampleObjectDisp* pSO;
                pSO = new ISampleObjectDisp();
                pSO->BindDefault();
This is the code which will instantiate a proxy object for us. The ensuing call to BindDefault() actually makes the DCOM request to launch the automation server and invoke the automation object, storing a reference to it in the proxy object.
delete pSO;
Label1->Caption = pSO->NumericValue;
                void __fastcall TForm2::Button1Click(TObject *Sender)
                {
                    Label1->Caption = pSO->NumericValue;
                }
                //---------------------------------------------------------
                void __fastcall TForm2::FormDestroy(TObject *Sender)
                {
                    delete pSO;
                }
                //--------------------------------------------------------
                void __fastcall TForm2::Button2Click(TObject *Sender)
                {
                    Label2->Caption = pSO->StringValue;
                }
                //-------------------------------------------------------
                void __fastcall TForm2::Edit1Exit(TObject *Sender)
                {
                    pSO->NumericValue = (Edit1->Text).ToInt();
                }
                //------------------------------------------------------

                void __fastcall TForm2::Edit2Exit(TObject *Sender)
                {
                    pSO->StringValue = WideString(Edit2->Text).Detach();
                }
                //-----------------------------------------------------
                void __fastcall TForm2::Button3Click(TObject *Sender)
                {
                    pSO->ShowProperties();
                }
Notice the call the WideString.Detach() when setting the value for the StringValue property. This ensures only one copy of the temporary WideString is created.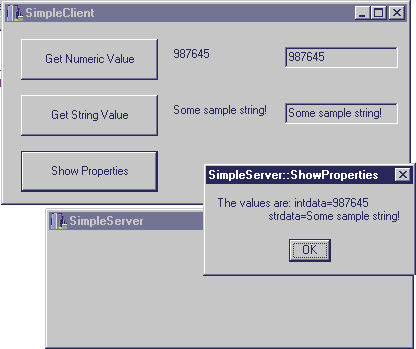
Deploying SimpleDCOM
So our trivial application is working great on one machine. Now let's split up the automation server and controller. In Calvert [1998] chapter 16, expert Charlie dicusses in detail how to successfully deploy a DCOM server on a Win95 machine and how to sucessfully connect to a DCOM server from a Win95 client. For the sake of brevity and simplicity, I will describe the steps for deploying our SimpleDCOM application across WinNT 4.0 machines. Do please consider Calvert's book the autoritative source for all the nefarious Win95 - DCOM issues.
- Start with Windows NT 4.0 Workstation Service Pack 3.
- Copy SimpleServer.exe, Vcl35.bpl, cp3240mt.dll and borlndmm.dll to the server machine. Run it once there to register it in the Windows registration database.
- Next, run the WinNT User Manager on the server by selecting Administrative Tools|User Manager off the Windows Start Menu.
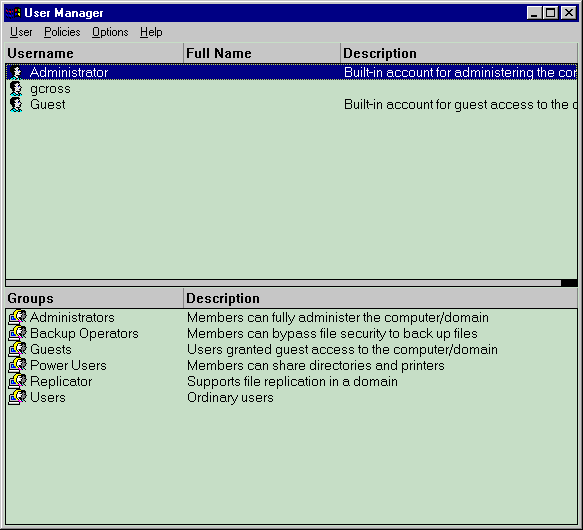
- For each user who will connect from another machine and invoke SimpleServer on this machine, create a User account. The User Name and Password must match those exactly as on the client machine, otherwise the user won't be able to launch the automation server.
- Now run dcomcfg.exe, found in the Windows\System32 directory.
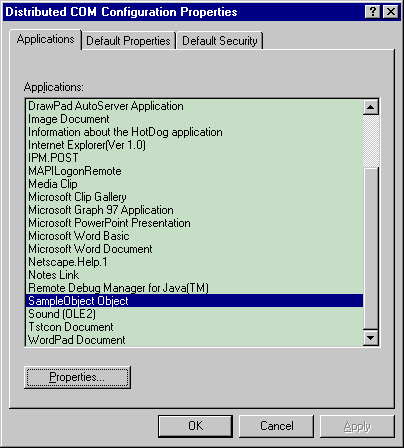
- Find SampleObject in the list, and select the Identity Tab. Set this to InterActive user. This will allow other computers to launch SimpleServer.exe.
- Under the Location tab, we will leave the setting at "Run application this computer." As the information in that tab explains, we can specify here on which computer the automation server is to be run.
- In the Security tab, we configure which users will have access to launch SimpleServer.exe. For all permissions listed, you must select the radio button for custom permissions. Edit each custom permission, click Add in the dialog, and add the users who will need access. Set Type of Access to Allow Access, Allow Launch and Full Control for each of Access, Launch and Configuration perminssions. These steps are quite particular in order to set up DCOM properly.
- You can run the automation server once on each client machine, and then run dcomcnfg.exe. In the Location tab for the SampleObject properties, select Run application on the following computer and specify the machine where the automation server resides.
- Instead of calling BindDefault(), call CoSampleObject::CreateRemote() passing the machine name of the server as the first parameter.
This concludes the tutorial on creating and deploying a trivial two-tier DCOM application. Surely this can not provide a solution for enterprise applications but it will get you started in programming with DCOM. One could keep building on the steps presented here and have the server call to other automation servers and thus a create multi-tiered DCOM application. One the common objectives of multi-tiered development, however, is to have a DBMS on one of the tiers. One of the easiest ways to accomplish this is to use Midas® technology and distributed datasets.
DCOM Threading Models
The ATL supports the concept of COM thread models. A thread model ascertains the manner in which threads in an OLE client are permitted to make method calls on an OLE server. Specifying a thread model is required so that the methods in an OLE server may be accessed safely by concurrent threads. It is also necessary so that the overhead of concurrency management can be foregone and performance times greatly improved if only a single thread is in the scenario.A DCOM server specifies its threading model in its call to CoInitializeEx. However, in-process COM servers by design never calls CoInitializeEx. So the threading model for an in-process COM server is specified in the registry in the string titled ThreadingModel under the InprocServer32 key under the entry for the server's CLSID. For example:
	HKEY_CLASSES_ROOT
	  CLSID
	     {8b3dea42-77dd-f9f9-8d48-000032ccad71}
		InprocServer32
		   ThreadingModel="Apartment"
Don Box really has some great articles in Microsoft Systems Journal which discuss thread models in detail, but in a nutshell, there are four:
For maximum efficiency, both client and server should employ compatible threading models. If they are not, for example a client running in MTA invoking an Apartment threaded server, DCOM will impose marshalling and performance could be crippled by several hundred factors.
- Single
- A client can only make calls to methods on the server from within the client's primary thread. That is, the thread which calls CoInitializeEx. If no threading model for a control is specified in the registry, this is the default.
- Apartment
- A client can make calls to methods on the server from secondary threads. However, from whichever thread a client initially calls a server, all subsequent calls must be from within that thread. Single and Apartment threaded servers are said to run in the Single-Threaded Apartment (STA).
- Free
- This model introduces the concept of the Mutliple Threaded Apartment (MTA). This basically means thread safety is implemented by the server for all of its method calls. The Free threading model is the least common of these four as it specifies concurrency management be applied for all method invocations on the server, even if the client is operating in an STA (that is, the client is using either the Single or Apartment threading model). Box's article explains the Free threading model is suitable in the rarer case that the server regularly be creating multiple worker threads itself.
- Both
- Both means the server will exercise concurrency management for method invocations from any client running in the MTA - that is, a client which has called CoInitializeEx passing the COINIT_MULTITHREADED flag. For clients running in the STA - that is one which has called CoInitializeEx with COINIT_APARTMENTTHREADED, or has simply called CoInitialize - the server will forgo concurrency management in so it can execute faster.
Accordingly, ATL offers the macros:
	_ATL_SINGLE_THREADED
	_ATL_APARTMENT_THREADED
	_ATL_FREE_THREADED
ATLVCL does not support the Free threading model, and uses the Apartment model by default. Microsoft documentation recommends the Apartment model and it is quite evident their perspective is from that of Internet Explorer being the client. Webpages which host ActiveX controls will be fastest if no DCOM marshalling be imposed and no concurrency management be necessitated.
